Pages

Showing posts with label Juniper. Show all posts

Sunday, March 25, 2018

Juniper LACP and MikoTik Bonding


Juniper LACP (Aggregation / Ether Channel)
---------------------------------------------
** We want to use two port ge3 and ge3 for Juniper LACP

set chassis aggregated-devices ethernet device-count 3

set interfaces ge-0/0/3 ether-options 802.3ad ae1
set interfaces ge-0/0/4 ether-options 802.3ad ae1

set interfaces ae1 description AE-Interface-Tayab
set interfaces ae1 aggregated-ether-options lacp active periodic fast
set interfaces ae1 unit 0 family ethernet-switching interface-mode trunk
set interfaces ae1 unit 0 family ethernet-switching vlan members all


MikroTik Bonding
------------------------
Goto Interface and click Bonding

Goto Tab "Bonding" use Slave Ports and use mode 802.3ad


Thursday, November 2, 2017

Block Spammer Source IP from Juniper


If our servers connected from Juniper ge-1/1/5 unit 0  and 47.74.19.98/32 is spam source-ip, then can reject/block/deny this from Juniper-Router as bellow


## Create filter rules
set firewall family inet filter spammer-ip term 32 from source-address 47.74.19.98/32
set firewall family inet filter spammer-ip term 32 then reject
set firewall family inet filter spammer-ip term 33 then accept

## Apply to interface
set interfaces ge-1/1/5 unit 0 family inet filter output spammer-ip


######## ########################## ##################

Wednesday, September 20, 2017

Juniper FULL Backup Restore


Taking backup file to ftp server (ftp.tayabkhan.com) from Juniper Router:

Login to router as root

root@mx-10-Router> start shell
%
% df -h
% cd /config
% ls
% ftp ftp.tayabkhan.com
Connected to ftp.tayabkhan.com.
220 (vsFTPd 2.2.2)
Name (ftp.tayabkhan.com: root): ftpusername
331 Please specify the password.
Password: ftp-password
230 Login successful.
Remote system type is UNIX.
Using binary mode to transfer files.
ftp> bin
200 Switching to Binary mode.
ftp> put juniper.conf.gz juniper.conf.gz-today
local: juniper.conf.gz remote: juniper.conf.gz-today
200 PORT command successful. Consider using PASV.
150 Ok to send data.
100% |********************************|  4811       00:00 ETA 226 Transfer complete.
4811 bytes sent in 0.00 seconds (2.20 MB/s)

% ls

*** Goto FTP server and find backup config file juniper.conf.gz-today

----------------------------------------------
## Restore configuration file to Juniper Router

** root Login to desired router to restore
root@mx-10-Router> start shell
%
% df -h
% cd /var/tmp
% ls
% ftp ftp.tayabkhan.com
Connected to ftp.tayabkhan.com.
220 (vsFTPd 2.2.2)
Name (ftp.tayabkhan.com: root): ftpusername
331 Please specify the password.
Password: ftp-password
230 Login successful.
Remote system type is UNIX.
Using binary mode to transfer files.
ftp> bin
200 Switching to Binary mode.
ftp> lcd /var/tmp
Local directory now /var/tmp
ftp> get juniper.conf.gz-today
local: juniper.conf.gz-today remote: juniper.conf.gz-today
200 PORT command successful. Consider using PASV.
150 Opening BINARY mode data connection for juniper.conf.gz-today (4811 bytes).
100% |*************************************************|  4811       00:00 ETA
226 Transfer complete.
4811 bytes received in 0.00 seconds (4.09 MB/s)

ftp> exit
% cd /var/tmp
% ls
% mv 
 mv juniper.conf.gz-today /config/juniper.conf.gz
% cli
tayab@MX-10-Router> 
tayab@MX-10-Router>configure
tayab@MX-10-Router# 
** To reset all configuration (if needed) tayab@MX-10-Router# load factory-default
tayab@MX-10-Router# load replace juniper.conf.gz
tayab@MX-10-Router# commit 
*** Hard reboot needed for smooth service


Thursday, July 20, 2017

Juniper interface / traffic Monitoring and SFP details


Juniper Interface SFP details::
IF we want to SFP information for ge-1/1/9.

then fpc-slot is 1 and pic slot is 1. Then we can find the port number 9.

# run show chassis pic fpc-slot 1 pic-slot 1

** Check Link Laser and arp
#  show interfaces diagnostics optics ge-1/0/8
# show arp interface ge-1/0/8    

--------------------------------------------------------

We can monitor specific interface total traffic or different filtered ways

** Monitor interface total traffic
root# run monitor interface ge-1/0/1

** Monitor a specific Host:
root# run monitor traffic interface ge-0/0/x matching "host 10.10.10.10" no-resolve

** Monitor a specific Protocol:
root# run monitor traffic interface ge-0/0/x matching arp

** Monitor a specificPort:
root# run monitor traffic interface ge-0/0/x matching "port 25"

** Monitor a specific IP address:
root# run monitor traffic interface ge-0/0/x matching "host 10.101.10.10" no-resolve detail

** Monitor A network:
root# run monitor traffic interface ge-0/0/x matching "net 225.1.1.0/24" no-resolve detail

** Monitor TCP port 179:
root# run monitor traffic interface ge-0/0/x matching "tcp port 179"

** Monitor UDP port 646:
root# run monitor traffic interface ge-0/0/x matching "udp port 646"

** Increase the size of capture:
root# run monitor traffic interface ge-0/0/x matching arp size 1500

Save the capture to a file:
root# run monitor traffic interface ge-0/0/x matching arp write-file capture.pcap <<<<< write-file is a hidden command so type it out

** Monitor Matching "not tcp port 3128” and matching tcp port 23
root# run monitor traffic interface ge-0/0/x matching "not tcp port 3128 and tcp port 23"

** Monitor A more complicated combination but might be useful in some cases:
root# run monitor traffic interface ge-0/0/x matching "arp or (icmp and host 3.3.3.2)"

=============================================================

Sunday, July 24, 2016

Juniper IDP via NMS


IDP 8200 using NMS (Network and Security Manager) software


Directly domain block by above method.. must add those to any policy like IIG-Policy,VC, URL Block and also update device(idp8200)


*** Filter by Custom attack...  and must add those to any policy like IIG-Policy,VC, URL Block and also update device(idp8200)

 IDP Object: +
name: BTRC-www.xyz.com
Description: www.xyz.com/collections/4212847/BDR-Mutiny
Severity: major
Category: HTTP
Keywords: collections 4212847 BDR-Mutiny

 Attach Versions: +
    tik mark:
idp-5.1.0
idp-5.1.110120907
idp-5.1.110121210
type: Compund Attack -> Next

 Protocol Type: Service
Service: http (predefined) -> Next

 Scope: Transaction
 Boolean Expression: m01 AND m02
 +
 signature
Member Name: m01
pattern: \[(.*\.)?xyz\.com\]

Context: HTTP : HTTP Header Host (predefined)
Direction: Client to Server
ok
 +
  Member Name: m02
pattern: \[/collections/4212847/BDR-Mutiny\]

Context: HTTP : HTTP URL Parsed (predefined)
Direction: Client to Server

Finish


Wednesday, March 23, 2016

Netflow from Juniper and Cisco


Juniper Netflow::

Our Example Flow Server: 192.168.1.10 and we want to send traffic of ge-1/0/7
We can send all interfaces traffic by setting SNMP


set forwarding-options sampling input rate 100
set forwarding-options sampling input run-length 9
set forwarding-options sampling input max-packets-per-second 7000

set forwarding-options sampling family inet output flow-server 192.168.1.10 port 9996
set forwarding-options sampling family inet output flow-server 192.168.1.10 version 5

set firewall filter all term all then sample
set firewall filter all term all then accept

set interfaces ge-1/0/7 unit 0 family inet filter input all
set interfaces ge-1/0/7 unit 0 family inet filter output all

Saturday, December 19, 2015

Juniper Real-Time Performance Monitoring (RPM)


tayab@MX#  edit services rpm


[edit services]
rpm {
  probe server-network-monitor {
   test icmp-test {
     probe-type icmp-ping-timestamp;
     target address 203.190.x.x;
     probe-count 15;
     probe-interval 1;
     test-interval 600;
   }
  }
}


set services rpm probe icmp-test test icmp probe-type icmp-ping-timestamp
set services rpm probe icmp-test test icmp target address 192.168.10.90
set services rpm probe icmp-test test icmp probe-count 15
set services rpm probe icmp-test test icmp probe-interval 1
set services rpm probe icmp-test test icmp test-interval 600
set services rpm probe icmp-test test http probe-type http-get
set services rpm probe icmp-test test http target url http://www.tayabkhan.com
set services rpm probe icmp-test test http probe-count 15
set services rpm probe icmp-test test http probe-interval 1

set services rpm probe icmp-test test http test-interval 600

** To see results

tayab@MX#   run show services rpm probe-results


Configure the target address as the loopback address of the remote device (in this case, the loopback address on any-router).
You must also configure the number of probes in each test, the length of time between probes, and the length of time between tests. Juniper recommends configuring between 10 and 20 probes at one-second intervals. This particular test is going to run every ten minutes

Real-Time Performance Monitoring (RPM) enables you to configure active probes to track and monitor traffic. Probes collect packets per destination and per application, including PING Internet Control Message Protocol (ICMP) packets, User Datagram Protocol and Transmission Control Protocol (UDP/TCP) packets with user-configured ports, user-configured Differentiated Services code point (DSCP) type-of-service (ToS) packets, and Hypertext Transfer Protocol (HTTP) packets. 

Probe configuration and probe results are supported by the command-line interface (CLI) and SNMP.

The following probe types are supported with DSCP marking:

ICMP echo
ICMP timestamp
HTTP get (not available for BGP RPM services)
UDP echo
TCP connection
UDP timestamp
With probes, you can monitor the following:

Minimum round-trip time
Maximum round-trip time
Average round-trip time
Standard deviation of the round-trip time
Jitter of the round-trip time—The difference between the minimum and maximum round-trip time
One-way measurements for ICMP timestamp probes include the following:

Minimum, maximum, standard deviation, and jitter measurements for egress and ingress times
Number of probes sent
Number of probe responses received
Percentage of lost probes

Monday, December 7, 2015

Juniper Outputs in Web view


tayab@MX> show bgp summary | display xml
or
tayab@DOL-MX>  show route protocol bgp | display xml


XML Output of BGP Summary
--------------------------------------
<rpc-reply xmlns:junos="http://xml.juniper.net/junos/13.3R1/junos">
    <bgp-information xmlns="http://xml.juniper.net/junos/13.3R1/junos-routing">
        <group-count>4</group-count>
        <peer-count>4</peer-count>
        <down-peer-count>0</down-peer-count>
        <bgp-rib junos:style="brief">
            <name>inet.0</name>
            <total-prefix-count>1921</total-prefix-count>
            <received-prefix-count>1921</received-prefix-count>
            <accepted-prefix-count>1879</accepted-prefix-count>
            <active-prefix-count>1878</active-prefix-count>
            <suppressed-prefix-count>0</suppressed-prefix-count>
            <history-prefix-count>0</history-prefix-count>
            <damped-prefix-count>0</damped-prefix-count>
            <total-external-prefix-count>1921</total-external-prefix-count>
            <active-external-prefix-count>1878</active-external-prefix-count>
            <accepted-external-prefix-count>1879</accepted-external-prefix-count>
            <suppressed-external-prefix-count>0</suppressed-external-prefix-count>
            <total-internal-prefix-count>0</total-internal-prefix-count>
            <active-internal-prefix-count>0</active-internal-prefix-count>
            <accepted-internal-prefix-count>0</accepted-internal-prefix-count>
            <suppressed-internal-prefix-count>0</suppressed-internal-prefix-count>
            <pending-prefix-count>0</pending-prefix-count>
            <bgp-rib-state>BGP restart is complete</bgp-rib-state>
        </bgp-rib>
        <bgp-peer junos:style="terse" heading="Peer                     AS      InPkt     Ou
ted/Damped...">
            <peer-address>43.245.235.1</peer-address>
            <peer-as>58691</peer-as>
            <input-messages>59785</input-messages>
            <output-messages>60259</output-messages>
            <route-queue-count>0</route-queue-count>
            <flap-count>8</flap-count>
            <elapsed-time junos:seconds="1643733">2w5d0h</elapsed-time>
            <peer-state junos:format="1/43/1/0             0/0/0/0">Established</peer-state>
            <bgp-rib>
                <name>inet.0</name>
                <active-prefix-count>1</active-prefix-count>
                <received-prefix-count>43</received-prefix-count>
                <accepted-prefix-count>1</accepted-prefix-count>
                <suppressed-prefix-count>0</suppressed-prefix-count>
            </bgp-rib>
        </bgp-peer>
        <bgp-peer junos:style="terse">
            <peer-address>59.152.98.41</peer-address>
            <peer-as>58715</peer-as>
            <input-messages>15930</input-messages>
            <output-messages>16501</output-messages>
            <route-queue-count>0</route-queue-count>
            <flap-count>28</flap-count>
            <elapsed-time junos:seconds="357732">4d 3:22:12</elapsed-time>
            <peer-state junos:format="0/1/1/0              0/0/0/0">Established</peer-state>
            <bgp-rib>
                <name>inet.0</name>
                <active-prefix-count>0</active-prefix-count>
                <received-prefix-count>1</received-prefix-count>
                <accepted-prefix-count>1</accepted-prefix-count>
                <suppressed-prefix-count>0</suppressed-prefix-count>
            </bgp-rib>
        </bgp-peer>
        <bgp-peer junos:style="terse">
            <peer-address>59.152.98.45</peer-address>
            <peer-as>58715</peer-as>
            <input-messages>16048</input-messages>
            <output-messages>16559</output-messages>
            <route-queue-count>0</route-queue-count>
            <flap-count>26</flap-count>
            <elapsed-time junos:seconds="357731">4d 3:22:11</elapsed-time>
            <peer-state junos:format="2/2/2/0              0/0/0/0">Established</peer-state>
            <bgp-rib>
                <name>inet.0</name>
                <active-prefix-count>2</active-prefix-count>
                <received-prefix-count>2</received-prefix-count>
                <accepted-prefix-count>2</accepted-prefix-count>
                <suppressed-prefix-count>0</suppressed-prefix-count>
            </bgp-rib>
        </bgp-peer>
        <bgp-peer junos:style="terse">
            <peer-address>198.32.167.1</peer-address>
            <peer-as>65534</peer-as>
            <input-messages>34634</input-messages>
            <output-messages>25520</output-messages>
            <route-queue-count>0</route-queue-count>
            <flap-count>93</flap-count>
            <elapsed-time junos:seconds="677003">1w0d20h</elapsed-time>
            <peer-state junos:format="1875/1875/1875/0     0/0/0/0">Established</peer-state>
            <bgp-rib>
                <name>inet.0</name>
                <active-prefix-count>1875</active-prefix-count>
                <received-prefix-count>1875</received-prefix-count>
                <accepted-prefix-count>1875</accepted-prefix-count>
                <suppressed-prefix-count>0</suppressed-prefix-count>
            </bgp-rib>
        </bgp-peer>
    </bgp-information>
    <cli>
        <banner></banner>
    </cli>
</rpc-reply>
---------------------------

** Copy this XML to paste in any web server
You can also convert this XML file to HTML file  online 
 http://codebeautify.org/xml-to-html-converter


*****  call  this  route.xml file to an HTML file this way....
-----------------------------------------------------------------------

      <html>
<head>
<title>BGP Route OUTPUT</title>
<link rel="stylesheet" href="http://maxcdn.bootstrapcdn.com/bootstrap/3.3.5/css/bootstrap.min.css">
<script src="https://ajax.googleapis.com/ajax/libs/jquery/1.11.3/jquery.min.js"></script>
<script src="http://maxcdn.bootstrapcdn.com/bootstrap/3.3.5/js/bootstrap.min.js"></script>
</head>
<body>

<?php
// Loading the XML file
$xml = new SimpleXMLElement("route.xml", 0, true);
?>

<div class="container">
<div class="page-header">
<h3><a href="testcode1.php">Test-ISP</a> <small>ISP Description</small></h3>
</div>

<table class="table table-hover">
<thead>
<tr>
<th>Route</th>
<th>AS Path</th>
<th>Protocol</th>
<th>Validation</th>
</tr>
</thead>

<?php

$startPage = $_GET['page'];
$perPage = 500;
$currentRecord = 0;
foreach($xml->{'route-information'}->{'route-table'}->{'rt'} as $record){
$currentRecord += 1;
if($currentRecord > ($startPage * $perPage) && $currentRecord < ($startPage * $perPage + $perPage)){

$route = str_replace("\n", "", $record->{'rt-destination'});
$aspath = str_replace("\n", "", $record->{'rt-entry'}->{'as-path'});
$protocolname = str_replace("\n", "", $record->{'rt-entry'}->{'protocol-name'});
$validation = str_replace("\n", "", $record->{'rt-entry'}->{'validation-state'});
echo "<tbody>";
echo "<tr>";
echo "<td class=\"small\">{$route}</td>";
echo "<td class=\"small\">{$aspath}</td>";
echo "<td class=\"small\">{$protocolname}</td>";
if ($validation=="invalid")
{echo "<td class=\"small\"><span class=\"label label-danger\">$validation</span></td>";}
elseif ($validation=="valid")
{echo "<td class=\"small\"><span class=\"label label-success\">$validation</span></td>";}
else
{echo "<td class=\"small\"><span class=\"label label-default\">$validation</span></td>";}
echo "</tr>";
echo "</tbody>";
}//end of if loop
}//endo of foreach loop

//pagination
for ($i = 1; $i <= ($currentRecord / $perPage); $i++) {
echo("<a href='testcode1.php?page=".$i."'>\t".$i."</a>");
}
?>
</table>
</div>
</body>
</html>

--------------------------------------------------------------------------------------------


Thursday, December 3, 2015

Juniper System Management


show host ns lookup
show version displays software running on the box
show system software displays installed packages
show system uptime uptime of the router
show system processes Show the process table
show system statistics Show protocol statistics
show system connections lists only active IP sockets on RE
show system users Show users currently logged into the system
show system storage displays the amount of amount of free disk space on file system
root% df -k show system storage from Shell
show system boot-messages displays contents of boot log  (boot-up messages)
show system virtual-memory displays current memory state
request system reboot Restarts the system
request system halt Stops the router and prepares it to be shut down
request system reboot Reboot the system
request system snapshot Save config in /altconfig and software in /altroot before upgrade
request support information show tech
request system software add <pkgname> performs bsd pgkadd; always use jbundle (4->5 jinstall)

Sunday, September 20, 2015

Juniper FTP server to Upload file or OS


##################################################
Enable FTP server from configure mode

# set system services ftp
# commit

and upload any file using Filezilla FTP client to Juniper
Use  any username and passowrd by created
(#set system login user tayab class super-user
#set system login user tayab authentication plain-text-password)

*** Upload file will find from shell

tayab@MX> start shell
% cd /var/home/tayab
% ls
% mv osname.tar /var/tmp

** You will find your file ***
#####################################################

Sunday, August 16, 2015

Juniper Warning Boot from Backup after corruption primary root partition and Auto recovery


Juniper Warning Boot from Backup after corruption primary root partition and Auto recovery


*** When we loging to any Juniper Router / Switch if this shows like bellow....

THIS DEVICE HAS BOOTED FROM THE BACKUP JUNOS IMAGE


***********************************************************************
**                                                                   **
**  WARNING: THIS DEVICE HAS BOOTED FROM THE BACKUP JUNOS IMAGE      **
**                                                                   **
**  It is possible that the primary copy of JUNOS failed to boot up  **
**  properly, and so this device has booted from the backup copy.    **
**                                                                   **
**  Please re-install JUNOS to recover the primary copy in case      **
**  it has been corrupted.                                           **
**                                                                   **
***********************************************************************


### Solutions ####
##################


* Check Alarms by bellow command

## show chassis alarms

2 alarms currently active
Alarm time               Class  Description
2015-07-10 21:09:58 UTC  Major  PEM 1 Output Failure
2015-07-10 21:09:53 UTC  Minor  Host 0 Boot from backup root


* Now check partitions by bellow command

### show system storage partitions

Boot Media: internal (ad0)
Active Partition: ad0s1a
Backup Partition: ad0s2a
Currently booted from: backup (ad0s2a)

Partitions information:
  Partition  Size   Mountpoint
  s1a        619M   altroot
  s2a        620M   /      
  s3e        49M    /config
  s3f        615M   /var    
  s4a        54M    recovery
  s4e        5.6M


* We can repair the primary partition, by using "request system snapshot media internal slice alternate" without any downtime.

** Copy from backup to Active partition (Also Format Primary Active Partition) by bellow command
### request system snapshot media internal slice alternate

Formatting alternate root (/dev/ad0s1a)...
Copying '/dev/ad0s2a' to '/dev/ad0s1a' .. (this may take a few minutes)
The following filesystems were archived: /


* The following commands are issued to verify the Junos image installed on each slice:

        ###show system snapshot media internal slice 1
        ###show system snapshot media internal slice 2

** againg see alarms by ## show chassis alarms 

** To avoid alarms, use the following command to ensure that the switch boots from the primary partition:

## For EX2200 Switch **  request system reboot slice alternate media internal

### request system reboot slice alternate media internal
*N.B. to reboot now and show the effect  ## request system reboot

** after reboot check Currently booted from:  active or backup ?? if active then ok....
## show system storage partitions          
Boot Media: internal (ad0)
Active Partition: ad0s1a
Backup Partition: ad0s2a
Currently booted from: active (ad0s1a)


** Use auto recovery for some Juniper devices like SRX
### request system autorecovery state save  


Saturday, August 1, 2015

Juniper root password recovery

Juniper root password recovery::


### Connect your device  directly with a Laptop or PC via console:


Configure the port settings as follows:
Bits per second: 9600
Data bits: 8
Parity: None
Stop bits: 1
Flow control: None


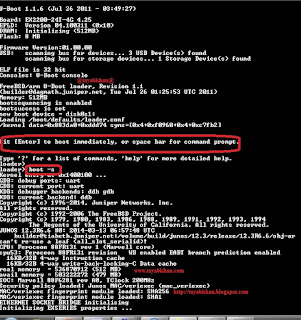
### Power off and  on your switch by plugging in the power cord of the device.

### Hit [Enter] to boot immediately, or space bar for command prompt.
Booting [kernel] in 1 second...

loader>

### Type "boot -s" when it shows "loader>"

### loader> boot -s

### Type "recovery" when it shows "/bin/sh:"

### enter full pathname of shell or 'recovery' for root password recovery or RETURN for /bin/sh: recovery


### Enter configuration mode in the CLI:

user@switch> configure

Set the root password. For example:

root@switch# set system root-authentication plain-text-password

root@switch# set system login user noc uid 210

## Exit configuration mode in the CLI.

root@switch#exit


root@switch> exit

### enter y to reboot the switch

Reboot the system? [y/n] y

Wednesday, April 22, 2015

Juniper block Telnet and SSH Brute Force log-in attacks


Juniper block Telnet and SSH Brute Force log-in attacks
========================================

set system login retry-options tries-before-disconnect 5
set system login retry-options backoff-threshold 3
set system login retry-options backoff-factor 10
set system login retry-options lockout-period 6


==========================
See the lockout users

show system login lockout

============================

backoff-threshold: Sets the threshold for the number of failed log-in attempts on the device before the user experiences a delay when attempting to re-enter a password. When a user incorrectly logs into the device and hits the threshold of failed log-in attempts, the user experiences a delay (set in the backoff-factor statement) before he can attempt to log into the device again. The valid range for this option is 1 to 3 attempts.

backoff-factor: Sets the length of the delay, in seconds, after each failed log-in attempt. When a user incorrectly logs into the device, the user must wait the configured amount of time before he can attempt to log into the device again. The length of the delay increases by the backoff-factor value for each subsequent log-in attempted after the value specified in the backoff-threshold statement is reached. The valid range for this option is 5 to 10 seconds.

tries-before-disconnect: Sets the maximum number of times the user is allowed to enter a password in an attempt to log into the device through SSH or Telnet. When the user reaches the maximum number of failed log-in attempts, he is locked out of the device. The user must wait the configured amount of minutes in the lockout-period statement before he can attempt to log back into the device. The tries-before-disconnect statement must be set when the lockout-period statement is set; otherwise, the lockout-period statement is meaningless. The valid value for this option is 1 to 10 attempts.

lockout-period: Sets the amount of time, in minutes, that the user must wait before he can attempt to log into the device after being locked out due to the number of failed log-in attempts specified in the tries-before-disconnect statement. The lockout-period must be greater than zero. The valid range for this option range is 1 to 43,200 minutes.

---------------------------------------------------------------------------------------------------------
We also can restrict / allow  ssh from a single ip address and deny all
---------------------------------------------------------------------------------------------------------
Here We restrict /deny all and allow only IP xxx.xxx.10.174/32 to ssh my juniper router
-----------------------------------------------------------------------------------------------------------
set interfaces lo0 unit 0 family inet filter input my-ip
set firewall family inet filter my-ip term 1 from source-address xxx.xxx.10.174/32
set firewall family inet filter my-ip term 1 from destination-port ssh
set firewall family inet filter my-ip term 1 then accept
set firewall family inet filter my-ip term 2 from source-address 0.0.0.0/0
set firewall family inet filter my-ip term 2 from destination-port ssh
set firewall family inet filter my-ip term 2 then discard
set firewall family inet filter my-ip term 3 then accept

------------------------------------------------------------------------------------------

Thursday, April 16, 2015

Juniper Router OS Recovery backup to primary


Juniper Router OS Recovery backup to primary
===================================

If  Your Juniper Routers primary OS crash and  it will run from backup OS.
You need to take a copy from Backup to primary and then reboot your router to run from primary OS


run request system snapshot slice alternate


Thursday, April 2, 2015

ICMP TTL details


Time to live (TTL) or hop limit is a mechanism that limits the lifespan or lifetime of data in a computer or network
Time-to-live (TTL) is a value in an Internet Protocol (IP) packet that tells
a network router whether or not the packet has been in the network too long and should be discarded.


For PING Source machine doesn't really matter,
it's what the destination machine uses as it's TTL when it generates the ICMP echo response


TTL is all about the destination and has nothing to do with the source,
different OS has different TTL (considered as an aspect of the OS fingerprinting):

Windows: 128

Linux/Juniper/Mikrotik: 64

Cisco: 255

Solaris: 255

Those numbers will be reduce after each hope crossing.

Example-1: 2.2.2.2 is a cisco router including four routers/hopes, so TTL show 256-4=251

Pinging B [2.2.2.2] with 32 bytes of data:

Reply from 2.2.2.2: bytes=32 time=18 ms TTL=251
Reply from 2.2.2.2: bytes=32 time=21 ms TTL=251


Example-2: 3.3.3.3 is a Windows Machine including three routers/hopes, so TTL show 128-3=125

Pinging B [3.3.3.3] with 32 bytes of data:

Reply from 3.3.3.3: bytes=32 time=18 ms TTL=125
Reply from 3.3.3.3: bytes=32 time=21 ms TTL=125


Example-3: 2.2.2.2 is a Linux Machine including four routers/hopes, so TTL show 64-4=60

Pinging B [2.2.2.2] with 32 bytes of data:

Reply from 2.2.2.2: bytes=32 time=18 ms TTL=60
Reply from 2.2.2.2: bytes=32 time=21 ms TTL=60


The default Windows 95/98 TTL value is 32 hops.
Some users recommend changing this to 128 if you have difficulty reaching certain sites.


Using the multicast IP protocol,
the TTL value indicates the scope or range in which a packet may be forwarded.

By convention:


0 is restricted to the same host
1 is restricted to the same subnet
32 is restricted to the same site
64 is restricted to the same region
128 is restricted to the same continent
255 is unrestricted


Thursday, January 1, 2015

Juniper OS update


############################################################

## Put the OS file osname.tar  in /var/tmp/ by ssh login

## go to the console

request system software add no-copy no-validate /var/tmp/osname.tar


######################## wait until reboot ##################
###########################################


##################################################
Enable FTP server from configure mode

# set system services ftp
# commit

and upload any file using Filezilla FTP client to Juniper
Use  any username and passowrd by created
(#set system login user tayab class super-user
#set system login user tayab authentication plain-text-password)

*** Upload file will find from shell

tayab@MX> start shell
% cd /var/home/tayab
% ls
% mv osname.tar /var/tmp

** You will find your file ***
** Finally run bellow command

> request system software add /var/tmp/junos-srxsme-10.0R2-domestic.tgz no-copy no-validate reboot


request system reboot

#####################################################

Tuesday, July 8, 2014

Juniper Router or Switches Alarm Signal


 Alarm Signal Problem  Remove for Juniper Device:
==================================

First check Alarm with bellow command::

root@Router> show system alarms  
1 alarms currently active
Alarm time               Class  Description
2014-06-17 08:15:17 BDT  Minor  Rescue configuration is not set

*** Here Shows Rescue Configuration is not set. A rescue configuration allows administrators to define a known working configuration that can be loaded (this is called a configuration roll-back) at any time.

Setting Rescue Configuration::

 root@Router> request system configuration rescue save

This will off the alarm signal .. You can check physically of via command either alarm off or not.

Check again:::
 root@Router> show system alarms                
No alarms currently active

============== Tayab Khan =============
====================================


Thursday, April 3, 2014

Juniper Date and Time manually or from NTP sever

### Juniper Date Time Show and set manually and from NTP server

To show date time
================

user1@router>show system uptime    

Current time: 2014-04-03 11:34:26 BDT
System booted: 2014-01-15 11:48:29 BDT (11w0d 23:45 ago)
Protocols started: 2014-01-15 11:49:26 BDT (11w0d 23:45 ago)
Last configured: 2014-04-02 13:32:26 BDT (22:02:00 ago) by root
11:34AM  up 77 days, 23:46, 2 users, load averages: 0.27, 0.70, 0.65


IN CLI MOde

set date YYYYMMDDHHMM.ss source-address

user1@myswitch# set date 201102151010.55

For example, the following command sets the date and time from an NTP server:
user1@myswitch# set date ntp 1.bd.pool.ntp.org

For example, the following command sets the date and time from more than one NTP server:
user1@myswitch# set date ntp 1.bd.pool.ntp.org 2.asia.pool.ntp.org

Thursday, January 16, 2014

Juniper Router Backup to ftp server command


set system archival configuration transfer-on-commit archive-sites "ftp://username:password@203.190.10.174"


system {
    archival {
        configuration {
            transfer-on-commit;
                archive-sites {
                    "ftp://admin:password@203.190.10.174";
                }
        }
    }
}

Tuesday, October 9, 2012

Juniper Command (snmp) Tips


=================
Tayab@M7i> show configuration | display set
set version 11.4R1.14

===============================

set snmp location NOC
set snmp contact "tayab@ictsolutionsforall.com"
set snmp community public authorization read-only
set snmp community public clients 192.168.0.0/16
set snmp community public clients 0.0.0.0/0 restrict
set snmp health-monitor
set routing-options static route 0.0.0.0/0 next-hop 192.168.10.2


=======================
Delete rules

delete set snmp community public authorization read-only
commit